Measurement Methods for Coatings on Metal Sheet
■ Introduction
When considering the wide range of coatings applied to metals, you may think of thick coatings such as automobile paint, coatings several microns (µm) thick such as the coating inside juice cans, or thin fluorinated oil coatings several nanometers (nm) thick on hard disks. The method (and the accessory) to measure the infrared spectrum of such coatings must be selected according to the analysis purpose, that is, whether the spectrum is to be used for qualitative or quantitative analysis.
■ Measurements by Reflection Methods

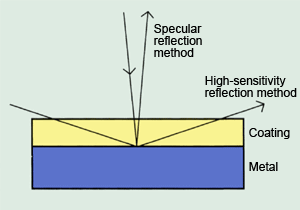
Fig. 1 Optics for Reflection Methods
Reflection methods are generally used to measure the coatings on metal sheets. As shown in Fig. 1, the specular reflection method and high-sensitivity reflection method involve transmission of infrared light through the sample, reflection from the metal surface, and then transmission back through the sample. The light path length for a single sample film thickness differs according to the angle of incidence. Fig. 1 shows that the light path length for the high-sensitivity reflection method is larger than that for the specular reflection method, because of its greater angle of incidence.
Select the specular reflection method or high-sensitivity reflection method according to the thickness of the coating on the metal sheet.
(1) Specular Reflection Method
Coatings over about 1 to 2 µm thick are measured using the specular reflection method. The SRM-8000 Series specular reflectance accessory for the IRPrestige-21/FTIR-8000 Series has a mean 10° angle of incidence.
If uncoated metal sheet is available, use it for the background measurement. If no such metal sheet is available, use the aluminum mirror supplied to measure the background. Measurements are easy and offer good reproducibility: simply measure the sample with the coated side facing downward. If the thickness of the sample coating is known, a calibration curve can be created using the peak heights and areas and the coating thickness can be quantitated.
Specular reflectance measurements are sometimes affected by interference fringes in the same way as transmission measurements on films. Interference fringes may appear in the spectrum if the coating surface is mirror-smooth and the coating thickness lies within a certain range. If the sample refractive index is known, the coating thickness can be determined from the angle of incidence and the number of interference fringes. Similarly, if the coating thickness is known, the refractive index of the coating can be determined. If the spectrum is used for qualitative analysis, however, such information is not required. Rough the film surface with sandpaper before making the measurement to prevent interference fringes from appearing.
(2) High-Sensitivity Reflection Method
RAS-8000 Series high-sensitivity reflection measurement accessory offers a mean angle of incidence of 70°, and 75° mean angle of incidence can be selected by attaching the light-shielding plate. A version with a larger 80° angle of incidence is also available. These are normally used for a coating thickness of several µm maximum. For measurement of thin films from several nm to 10 nm, a grid polarizer needs to be installed in the high-sensitivity reflection measurement accessory to use parallel polarized light.
As in the specular reflection method, perform the background measurement on an uncoated metal surface or using the aluminum or gold mirror supplied. Place the sample facing downward and measure the sample spectrum.
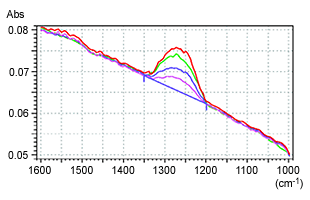
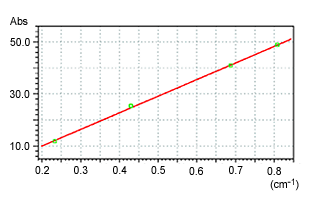
Fig. 2 shows the measurement of fluorinated oil on a hard disk made using the high-sensitivity reflection measurement accessory with 70° angle of incidence. The film thicknesses are: green 1.18 nm (11.8 Å), red 2.54 nm (25.4 Å), purple 4.10 nm (41.0 Å), and blue 4.88 nm (48.8 Å). Fig. 3 shows the calibration curve created from the peak areas in the range 1350 cm-1 to 1200 cm-1. These measurements were performed using the DLATGS detector in the main instrument and with the polarizer installed.
Measuring thick coatings (over several µm) by the high-sensitivity reflection method may result in displacement of the peak wavenumbers and distortion of the spectrum. Also, care must be taken when interpreting spectra for inorganic matter, as the peak wavenumbers may differ from those obtained by the transmission method due to the anomalous dispersion of the refractive index.

Fig. 2 Infrared Spectrum of Fluorinated Oil on a Hard Disk

Fig. 3 Calibration Curve of Fluorinated Oil
■ Attenuated Total Reflection (ATR) Method
ATR measurements are used if the specular reflection method causes interference fringes to appear or does not allow qualification of a sample due to saturated peaks when the coating is too thick. For multiple reflection ATR measurements, cut the sample to a suitable size for measurement, if possible. (Single-reflection ATR measurements require almost no cutting or other pretreatment.) Even test pieces that cannot be cut can be measured if they are flat. Simply mount the sample against the large face of the ATR prism, such that the sample does not cut the infrared light beam.
Cut a cuttable sample to the appropriate size using normal tin snips or scissors. This may result in burrs at the cut edge. Trying to measure a sample that has burrs may scratch the prism or the burrs may contact the prism so that the coating to be measured does not make close contact with the prism. Do not use a sample that has burrs. Remove the burrs with a file or press the burrs flat to obtain a good measured spectrum.
■ Other Methods
Users who do not have the accessories introduced above can analyze a sample of the coating.
Remove the sample with a well washed file or cutter and grind it finely in a mortar and pestle. Mix the sample powder well with KBr powder and form KBr pellets for transmission measurements. Alternatively, measure the mixed powder by the diffuse reflection method.
Using the SiC sampler makes sampling and measurement simple. Scrape off the sample coating with silicon-carbide (SiC) sandpaper attached to the holder. The infrared spectrum is measured by mounting the holder in the diffuse reflectance accessory. Use the SiC sandpaper to measure the background.
■ Conclusions
The specular reflection method, high-sensitivity reflection method, or attenuated total reflection (ATR) method must be selected to measure the coatings on metal sheets, according to the analysis purpose and the sample thickness.


